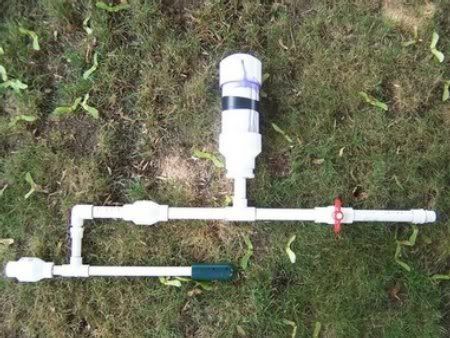
Technically speaking, I am going to be building an APH, which stands for Air Pressure Homemade. When I sat down to sketch out my plan for this gun, the first thing I attempted to address were the main issues I had last time I built one of these. On the right is a picture of the APH I built about four years ago.
From this photo, it's easy to see how inefficient this design was. It was tremendously top heavy, really long, and hard to operate. That being said, this gun was a MONSTER. I was able to get tremendous power and range out of this thing, and my homemade was on the small side of the spectrum when it came to the types of creations people posted online.
Thus, I had several things in the back of my mind when I went about laying out pipe for this new gun.
1) Smaller! I wanted my new gun to be tightly built and compact. No wasted pipe. What this really meant is that I had to be secure in my design; a lot of the excess pipe visible in the picture above stemmed primarily from my insecurities regarding the construction process. I wanted to leave myself extra space in case I messed up, and had to saw a section off and replace it via a coupler attachment.
2) Maintain power. To do this, I knew I couldn't miss with the basic principle. The pressure chamber had to be relatively long, and it had to be located on the top of the water gun in order to ensure the shortest route possible to the trigger valve.
3) On board reservoir. This was my major pet peeve with the last design. It relied upon an external tank of water. I crafted a backpack reservoir that could be used with this gun, and that worked well, but I wanted something that oozed gravitas and production value. I wanted an all-in-one, combat-ready soaking machine.
With these caveats in mind, I set about designing my new APH. The process of sketching out the design took about a week, and I set about refining the idea with the help of my friend and fellow PVC co-conspirator Sean, who in the past has helped me with projects ranging from homemade water guns to pneumatic water balloon launchers to tree houses to cartography. I don't have any scans of these sketches readily available, but perhaps I will post some in the near future. For now, you'll have to settle for real-life photos of the construction process:
Here are the parts I used for this gun. Everything was purchased at my local Home Depot for around 65 USD.
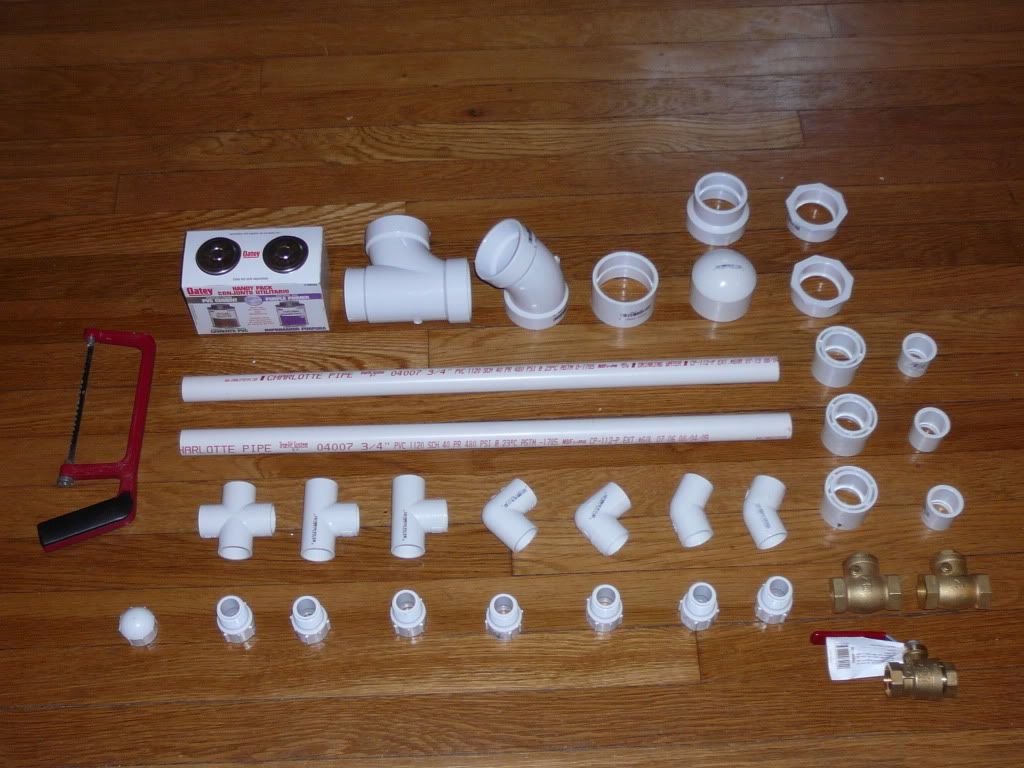
From left to right, top to bottom, the pieces were (1) can of purple PVC primer, (1) can of clear PVC cement, (1) 2"-2"-1 1/2" wye fitting, (1) 2" 45 degree elbow, (1) 2" coupler, (1) 2"endcap, (1) 2"- 1 1/2" reducer, (2) 2"- 1 1/2" bushings, (2) 2' sections of 3/4" pipe, (2) 1 1/2" - 1" bushings, (2) 1" - 3/4" bushings, (1) 3/4" cross, (2) 3/4" tees, (2) 3/4" 90 degree elbows, (2) 3/4" 45 degree elbows, (1) 3/4" threaded end cap, (7) 3/4" threaded male adaptors, (2) 3/4" brass swing check valves, (1) 3/4" brass ball valve.
Not pictured here are the parts I bought as a result of a mistake I made during construction. I ended up buying another male adaptor, and a matching female adapter. I also eventually bought a 1 1/2" threaded female fitting, and a 1 1/2" threaded male waste plug.
In addition to these pieces, I had some 2" pipe already laying around, which I used for the tank and pressure chamber. I also used the following tools/materials I had lying around my work shop:
- 2 part liquid epoxy
- 2 part putty epoxy
- 1" washer
- Dremel multi purpose tool
-1 power drill
-1 hacksaw
-1 Philips screwdriver
-1 medium-sized, hex-head bolt
-2 medium-sized screws
-(1) 1/2" by 2' wooden dowel
- 1 roll of electrical tape
- 1 wine bottle cork
Sorry for the lack of specific detail of the screws and bolts, but I have no idea what the specific sizes were when I was using them. I kinda just grabbed whatever was laying around! This brings me to my next point: You can build this sort of project a thousand different ways. If you are reading this and are interested in making something similar yourself, don't freak out if you can't find/don't have access to all of the parts I've listed. Here's what I recommend: Read through the entire series of articles, digest the information, really understand the process, and then design your own to fit your needs/resources. For example, you can replace the expensive and horrendously heavy brass valves with cheaper and lighter PVC ones (something I will try to do next time). The joy of creating this sort of thing is the individualized process. Make this project your own!
-Andrew